
Spreader bar hammocks with frames offer a unique relaxation experience that differs significantly from traditional gathered-end designs. Unlike their counterparts that bunch at the ends, spreader bar hammocks feature wooden or metal bars that stretch the fabric flat, creating a stable, bed-like surface for comfortable lounging. When paired with a dedicated frame, these hammocks become completely self-sufficient relaxation stations that don’t require trees, posts, or other external support structures.
Proper setup is crucial not just for your immediate comfort, but also for your safety and the longevity of your hammock system. An incorrectly assembled frame or improperly attached hammock can lead to instability, premature wear, or even accidents during use. The good news is that with careful attention to detail during setup, you’ll create a personal relaxation retreat that delivers years of enjoyable outdoor living.
This guide will walk you through every step of the process—from initial preparation to fine-tuning adjustments—ensuring your spreader bar hammock becomes the perfect oasis of comfort. Understanding the relationship between indoor and outdoor hammock placement significantly impacts how you’ll approach your setup, as each environment presents unique considerations for stability and positioning.
Whether you’re setting up a new purchase from our spreader bar hammock sets or reconfiguring an existing one, this comprehensive guide will help you master the art of creating your personal relaxation haven.
I. Essential Preparation: Before You Begin
Before diving into assembly, proper preparation ensures a smooth setup process and prevents frustrating setbacks. Always begin by thoroughly reading the manufacturer’s instructions that came with your hammock and frame. While this guide provides general principles, your specific model may have unique requirements or assembly sequences.
Start by methodically unpacking all components and laying them out in an organized manner. This simple step prevents lost parts and helps you visualize the assembly process. Take inventory against the parts list provided by the manufacturer, checking off each item to confirm everything is present before beginning. A typical spreader bar hammock with frame package includes:
- Frame support poles and base pieces
- Crossbars and connection hardware
- Spreader bars (sometimes pre-attached to the hammock)
- Hammock bed
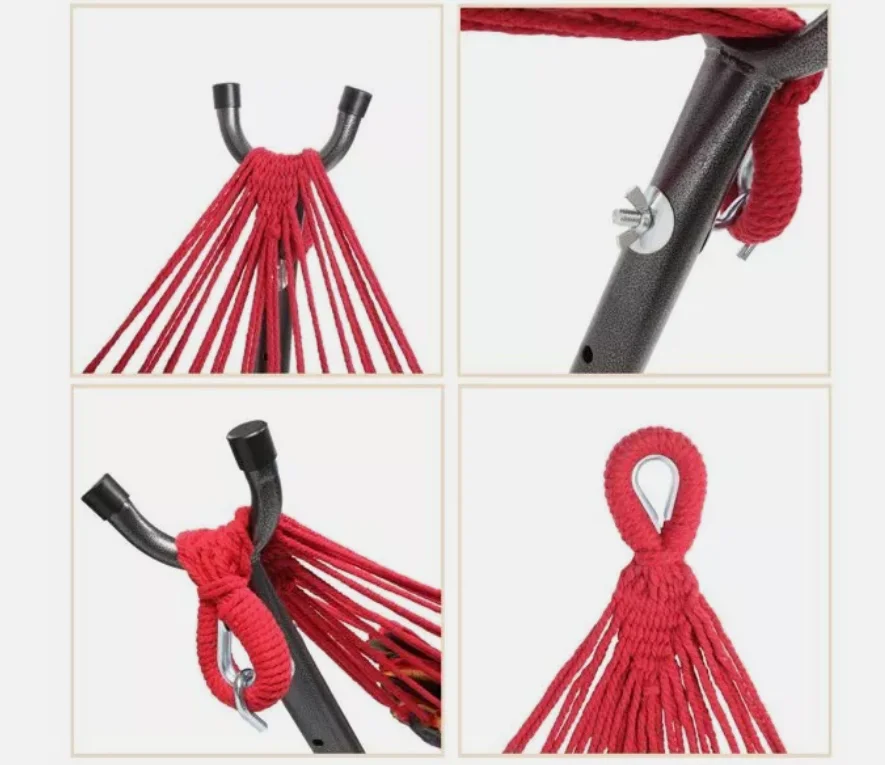
- Chains, ropes, or carabiners for attachment
- Assembly hardware (nuts, bolts, washers)
Prepare your work area by ensuring you have enough space—typically at least 15 feet (4.5 meters) in length and 6 feet (1.8 meters) in width. You’ll also want a minimum of 3 feet (1 meter) of clearance around all sides of the finished setup. Common tools you might need include:
- Adjustable wrench
- Screwdriver (Phillips and/or flathead)
- Rubber mallet
- Measuring tape
Selecting the ideal location for your hammock is as important as the assembly itself. The success of your hammock setup depends significantly on choosing one of the best indoor or outdoor hammock locations that provides both stability and the right ambiance. Look for level ground with good drainage if outdoors. For indoor setups, ensure your flooring can support the distributed weight and that ceiling height accommodates the frame.
Our fabric hammock sets have become particularly popular for their versatility in both indoor and outdoor environments, so consider your primary usage location when preparing your space.
II. Frame Assembly: Building Your Foundation
The frame provides the structural foundation for your spreader bar hammock, so careful assembly is essential for stability and safety. While specific instructions vary by model, most frames follow a similar assembly sequence:
Begin by identifying the base components that will contact the ground. These typically form an “H” or “X” shape at each end of the hammock.
Connect the base sections according to your specific instructions, usually by sliding metal tubes together or securing wooden components with provided hardware. Ensure all connections are fully seated—many metal frames use push-button mechanisms that provide an audible click when properly engaged.
Attach the vertical support poles to the base. These should be perpendicular to the ground and may require securing with nuts and bolts. If your frame has angle braces for stability, install these now.
Connect the horizontal supports between the two end assemblies. These create the length of your hammock stand and often serve as the attachment points for the hammock itself.
Install any secondary support bars or stabilizers according to your instructions. These prevent racking (side-to-side movement) and are crucial for stability.
Throughout the assembly process, regularly check that all parts align properly. Most quality frames include alignment indicators or pre-drilled holes that should match up precisely. If you encounter resistance when connecting components, stop and verify you’re using the correct parts—forcing connections often leads to damage.
Understanding hammock installation requirements and safety guidelines becomes particularly important during frame assembly, as this stage establishes the structural integrity of your entire setup. For those interested in exploring different support options, our collection of hammocks stands offers various designs specifically engineered to work seamlessly with spreader bar hammocks.
III. Hammock Attachment: Securing Your Comfort Zone
Once your frame is assembled, it’s time to attach the hammock itself. This step requires attention to detail to ensure proper orientation and tension for optimal comfort and safety.
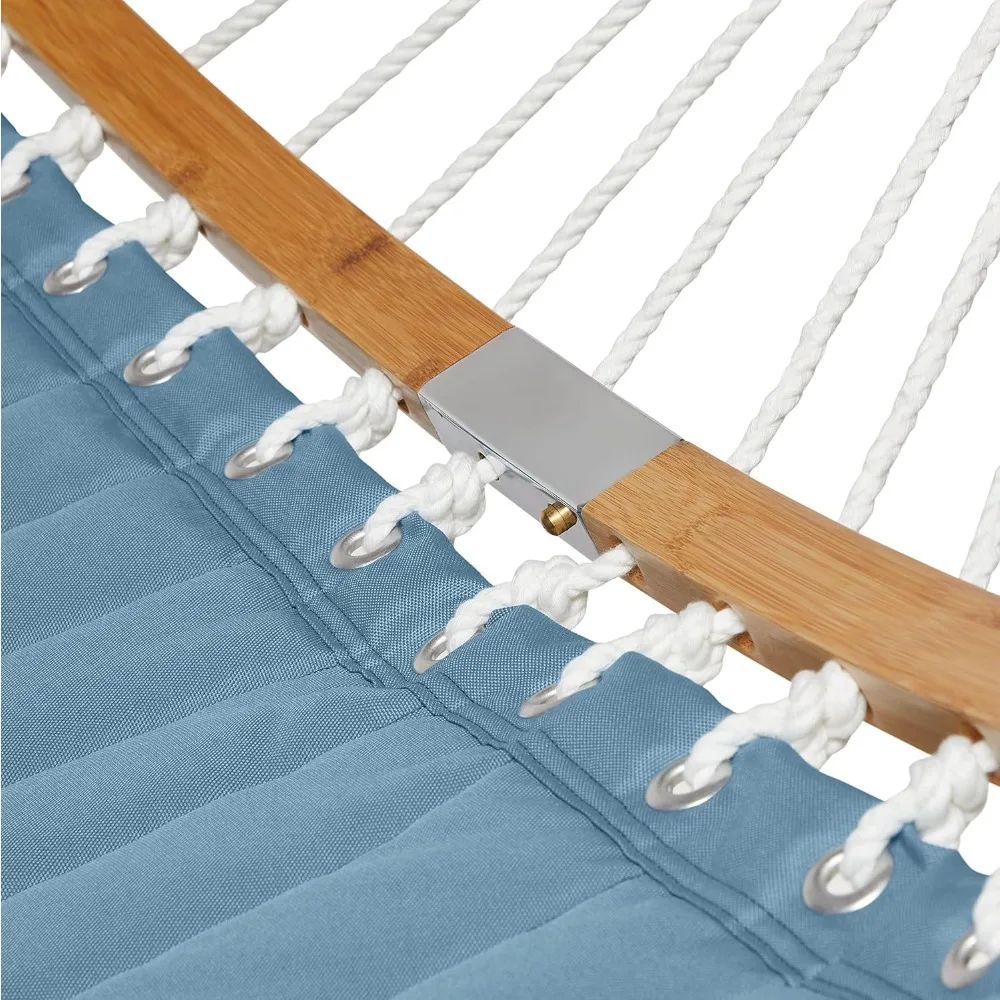
Begin by unfolding the hammock completely and checking for any twists in the fabric or chains. Proper orientation is crucial—many spreader bar hammocks have a designated head and foot end, sometimes indicated by different-colored ropes or design patterns. If your hammock includes pre-installed spreader bars, make sure they’re parallel to each other and properly secured to the hammock fabric.
To attach the hammock to the frame:
Start by identifying the attachment points on your frame—usually hooks, carabiners, or dedicated hardware at each end.
If your hammock uses chains for attachment, determine which link provides the appropriate initial tension. Starting with the middle link is often a good baseline that you can adjust later.
Attach one end of the hammock first, then move to the opposite end. This sequence allows you to assess the proper tension as you go.
For new hammocks that feel particularly tight, you may need to stretch the fabric slightly. Attach both ends at a looser tension initially, then gradually increase tension after the hammock has been hanging for several hours.
Many first-time users struggle with attachment because they don’t understand how spreader bars affect hammock balance and tension. Unlike traditional hammocks that naturally form a deep curve, spreader bar designs require more precise tensioning to create the signature flat surface while maintaining stability.
For larger setups, such as those found in our double two-person hammock sets, you’ll need to pay special attention to balanced attachment on both sides, as uneven tension becomes more noticeable with increased width and capacity.
IV. Perfecting Your Setup: Adjustments for Optimal Comfort
After basic assembly and attachment, fine-tuning your hammock’s position and tension transforms it from merely functional to supremely comfortable. The unique design of spreader bar hammocks requires specific adjustments that differ from traditional gathered-end varieties.
The ideal tension for a spreader bar hammock achieves a balance between flatness and flexibility. The hammock should appear relatively flat when unoccupied but have enough give to cradle your body comfortably when in use. Over-tensioning creates an uncomfortably rigid surface and stresses the fabric and frame, while under-tensioning can make the hammock unstable and prone to tipping.
For optimal height adjustment:
- The bottom of the hammock should rest approximately 12-18 inches (30-45 cm) from the ground when empty
- When seated, your feet should comfortably touch the ground
- When lying down, the hammock should support your body without excessive sagging
Weight distribution plays a crucial role in spreader bar hammock stability. Unlike traditional hammocks where you lie at an angle, spreader bar designs typically work best when you position yourself centrally with weight evenly distributed. When adjusting your setup, consider these factors:
- Center the spreader bars so they’re parallel to each other and perpendicular to the length of the hammock
- Check that chains or ropes hang straight without twisting
- Test stability by gradually applying weight from the center rather than the edge
Whether setting up indoors or out, understanding if it’s safe to hang a hammock indoors helps you make appropriate adjustments for each environment. Indoor setups may require more attention to protecting floors and ensuring attachments are secure for daily use.
For those requiring enhanced stability or higher weight capacity, our heavy duty hammock sets feature reinforced frames and attachment points specifically designed to provide extra support while maintaining the signature comfort of a spreader bar design.

V. Safety First: Critical Checks Before Use
Before enjoying your newly assembled spreader bar hammock, performing a thorough safety inspection is essential. This final verification ensures every component is secure and functioning as designed, preventing potential accidents.
Complete the following hardware inspection checklist:
- Verify all nuts, bolts, and fasteners are fully tightened
- Check that all push-button connections are fully engaged and locked
- Ensure chains or ropes are properly secured to both hammock and frame
- Confirm spreader bars are properly seated and secured
- Inspect fabric for any manufacturing defects or damage
Testing stability should be methodical and gradual:
- Begin by applying light pressure with your hands at the center of the hammock
- Sit slowly in the middle of the hammock, keeping feet on the ground
- Distribute your weight evenly before fully reclining
- Test gentle movement while in the hammock to ensure it remains stable
Always respect the manufacturer’s weight capacity guidelines. Exceeding these limits compromises safety and accelerates wear on both the hammock and frame. Most single spreader bar hammocks have weight limits between 250-450 pounds (113-204 kg), while doubles may accommodate 450-600 pounds (204-272 kg).
Teach all users proper entry and exit techniques:
- Approach from the side, never the end
- Use both hands to stabilize yourself on the frame or spreader bars
- Sit first before swinging legs up and reclining
- Exit by sitting up first, then standing while maintaining balance
Children require additional supervision with spreader bar hammocks, as the design presents different stability characteristics than traditional hammocks. Our comprehensive indoor and outdoor hammock safety guide provides additional precautions for users of all ages.
For those who value portability without sacrificing stability, our portable hammocks stands incorporate special safety features designed to maintain security even with frequent relocation.
VI. Expert Enhancement Tips: Elevating Your Hammock Experience
Once your spreader bar hammock is properly assembled and safety-checked, consider these expert enhancements to transform your basic setup into a luxury relaxation experience.
Strategic placement maximizes enjoyment and extends the usable life of your hammock:
- Position the hammock to capture desirable views while maintaining privacy
- For outdoor setups, consider partial shade that allows for both sun and shelter
- Indoor placements should complement room flow while allowing easy access
- Orient the hammock to catch prevailing breezes in summer
Weather protection significantly extends the lifespan of your investment:
- Apply appropriate weather protectants to wooden frame components
- Consider removable waterproof covers for quick protection during sudden weather changes
- Position hammocks away from irrigation systems and downspouts
- Elevate metal frame feet slightly on patios to prevent standing water contact
Complement your hammock with thoughtfully selected accessories:
- Side tables positioned at arm’s height provide convenient access to books, beverages, or electronics
- Weather-resistant pillows add comfort while expressing personal style
- Small storage solutions keep essentials within reach
- Lighting options extend usability into evening hours
Creating the perfect hammock placement in your home or garden involves balancing practical considerations with aesthetic goals. The right position enhances both the function of your hammock and the overall ambiance of your space.
For those seeking built-in weather protection, our hammock sets with canopy provide integrated shelter while maintaining the distinctive comfort of spreader bar designs.
VII. Troubleshooting Guide: Solving Common Setup Challenges
Even with careful assembly, you may encounter challenges with your spreader bar hammock setup. Here are solutions to common issues:
Problem: Uneven Tension
Solution: Adjust the chain links or rope positions incrementally on each side until balance is achieved. Many hammocks include multiple connection points specifically for fine-tuning tension. Remember that spreader bar hammocks should have relatively even tension across their width, unlike traditional hammocks.
Problem: Frame Wobbling or Instability
Solution: First, verify all connections are fully secured. Then check that your frame is on completely level ground—even slight slopes can create instability. For persistent wobbling, place thin, flat shims under specific feet to level the frame, or consider relocating to a more even surface.
Problem: Squeaking or Noise Issues
Solution: Identify the source of noise by gently moving different frame parts while listening. Apply appropriate lubricant to metal-on-metal connections (avoid getting lubricant on the hammock fabric). For wooden frames, check for parts rubbing together and lightly sand rough spots if needed.
Problem: Difficulty Attaching a New, Tight Hammock
Solution: New hammock materials often need time to stretch and settle. Temporarily attach the hammock using the looser chain links or rope positions. After several hours of hanging (or brief periods of gentle use), readjust to the desired tension.
Problem: Hammock Feels Unstable When Lying Down
Solution: Spreader bar hammocks have different balance characteristics than traditional designs. Enter from the side (never the end), sit centrally before reclining, and distribute weight evenly across the width. Avoid sudden movements until you’re accustomed to the unique stability features of framed hammocks with spreader bars.
Problem: Fabric Sagging Unevenly
Solution: Check that spreader bars are properly aligned and secured. Ensure the hammock fabric is evenly distributed along each spreader bar without bunching or twisting. Some quilted fabric hammock sets have specific tension requirements to maintain their cushioned comfort while preventing uneven sagging.
VIII. When and How Should You Adjust Your Setup Over Time?


Dark Wood Hammock Sets, Porch Swing Chair Sets
$653.82 Select options This product has multiple variants. The options may be chosen on the product page
A-Frame Stand Hammock Sets, Swinging Hammock Chair Sets
$154.62 Select options This product has multiple variants. The options may be chosen on the product page
Light Wood Hammock Sets, Swinging Hammock Chair Sets
$1,359.35 Select options This product has multiple variants. The options may be chosen on the product page
Quilted Fabric Hammock Sets, Spreader Bar Hammock Sets
$195.67 Select options This product has multiple variants. The options may be chosen on the product page
Classic Wooden Stand Hammock Sets, Heavy Duty Hammock Sets
$1,061.68 Select options This product has multiple variants. The options may be chosen on the product page
Hammock Sets with Canopy, Heavy Duty Hammock Sets
$286.31 Select options This product has multiple variants. The options may be chosen on the product page
Your hammock setup isn’t static—it requires occasional adjustments to maintain optimal performance and comfort over time. Understanding when and how to make these adjustments extends the life of your investment.
After the Initial Break-In Period
Most new hammocks experience some natural stretching during the first 2-4 weeks of regular use. Once this initial settling occurs, readjust the tension to maintain the proper height and support. This one-time adjustment often establishes your baseline settings for extended use.
Seasonal Adjustments
Weather changes significantly impact your hammock system:
* In high humidity or rainy conditions, fabric may temporarily stretch and require tightening
* During dry periods, fabric may contract, potentially requiring looser settings
* Wooden components expand and contract with moisture changes, potentially affecting frame fit
Signs That Indicate Adjustment Is Needed
* The hammock sits noticeably lower than your original setup
* You notice changes in comfort or stability during use
* Fabric appears excessively loose or overly taut
* Entry or exit becomes more difficult than usual
A simple quarterly tune-up keeps your hammock in optimal condition:
1. Check and tighten all hardware connections
2. Verify and adjust hammock height and tension
3. Inspect chains or ropes for wear and replace if necessary
4. Clean according to fabric-specific recommendations
Understanding whether it’s okay to leave your hammock outside in changing weather conditions helps determine your maintenance schedule and informs decisions about seasonal storage. For premium durability, our wooden hammocks stands include specific care recommendations to maintain their beauty and structural integrity through seasonal changes.

IX. Is Your Hammock Weather-Ready? Protection and Maintenance
Proper weather protection and maintenance are essential for extending the life of your spreader bar hammock and frame. Different materials require specific care approaches:
Frame Material Care:
* Metal frames: Regularly check for rust, especially at connection points. Apply touch-up paint to any chips or scratches to prevent corrosion. Some frames benefit from periodic application of appropriate protectants.
* Wooden frames: Apply recommended wood sealer or oil annually (or according to manufacturer guidelines). Check for splintering or cracking and sand lightly as needed before reapplying protection.
Fabric Protection:
* Remove tree sap, bird droppings, or other staining substances promptly
* Follow manufacturer cleaning recommendations—most fabrics benefit from gentle soap and water cleaning
* Allow hammock to dry completely before storage to prevent mildew
* Consider fabric-specific protectant sprays for enhanced weather resistance
When severe weather approaches, having a quick-removal plan saves your hammock from unnecessary damage:
1. Detach the hammock from one end and fold toward the center
2. Remove the second end and fold or roll the hammock according to manufacturer recommendations
3. Store in a dry location until weather passes
4. For extended storage, clean thoroughly before storing in a breathable container
Creating the perfect hammock haven involves balancing exposure and protection. Strategic placement near natural shelter or incorporating weather-resistant accessories can significantly extend your hammock’s outdoor season.
For those seeking traditional aesthetics with modern durability, our rope hammock sets include specific care instructions to maintain their classic appeal through various weather conditions.
X. Can You Move Your Hammock Setup? Relocation Tips
One advantage of frame-supported spreader bar hammocks is their mobility. Whether you’re chasing the perfect sun angle or completely redesigning your space, knowing how to properly relocate your hammock ensures continued stability and enjoyment.
Common reasons to relocate include:
* Seasonal sun position changes
* Accommodating outdoor gatherings
* Refreshing your space layout
* Moving to a new home
Follow these steps for efficient relocation:
Prepare for disassembly by photographing your current setup for reference, particularly noting chain link positions or tension adjustments that work well for you.
Remove the hammock first, detaching it from the frame and carefully folding or rolling it according to manufacturer recommendations.
Disassemble the frame in reverse order of assembly, keeping all hardware organized. For partial disassembly, mark connection points with tape to ensure proper reassembly.
Prepare the new location by ensuring level ground and adequate clearance on all sides.
Reassemble the frame following original instructions, then reattach the hammock using your noted tension settings.
Perform safety checks after relocation, testing stability and connections before full use.
Most relocations can be completed in 20-30 minutes for standard frames, though larger or more complex models may require additional time. Understanding the top features of heavy-duty hammock frames helps you identify which components require special attention during disassembly and moving.
For frequent movers or seasonal adjusters, our quick-setup hammock sets are specifically designed for effortless relocation without compromising stability or comfort.