

The Perfect Hammock: Finding Your Ideal Relaxation Spot
Finding the perfect spot for your hammock transforms an ordinary outdoor or indoor space into a personal retreat. The ideal hammock placement combines four essential elements: stability for safety, comfort for relaxation, proper installation for durability, and aesthetic appeal to enhance your environment.
Hammocks offer remarkable versatility, with options for both indoor and outdoor placement depending on your needs and available space. Each setting provides unique benefits – outdoor hammocks connect you with nature, while indoor options offer year-round relaxation regardless of weather conditions.
The benefits of hammock relaxation extend beyond simple comfort:
- Improved sleep quality through gentle rocking motion
- Reduced stress and anxiety levels
- Better spinal alignment compared to conventional beds
- Creation of a dedicated space for mindfulness and relaxation
- Enhanced outdoor living and connection with nature
At Outside Luxe, we believe the perfect hammock experience begins with proper placement. This guide will walk you through everything from fundamental safety principles to creative solutions for challenging spaces, ensuring your hammock becomes the relaxing sanctuary you deserve.
Essential Safety Principles for Any Hammock Setup
Before diving into specific placement options, understanding basic hammock safety principles ensures your relaxation doesn’t end with an unexpected trip to the ground. These fundamentals apply whether you’re hanging between trees or inside your living room.
Respect weight capacity limits
Every hammock has specified weight limits you must follow. Single hammocks typically support 300 lbs (136 kg), while double hammocks generally accommodate 450-500 lbs (204-227 kg). Never exceed these limits, even temporarily, as this can lead to sudden failure.Identify proper anchor points
Safe anchor points must be strong and stable. For trees, look for healthy specimens at least 6-8 inches (15-20 cm) in diameter. Indoor mounting requires locating wall studs or ceiling joists – never attach to drywall alone. The hammock installation requirements and safety guide provides detailed advice for identifying structural support.Maintain appropriate hanging height
The ideal hammock height allows for proper sag while preventing ground contact. When seated, your hammock should position you about 18 inches (45 cm) above the ground – high enough to avoid touching the ground when fully weighted but low enough for easy entry and exit.Calculate proper hammock sag
A hammock hung too tightly creates pressure points and instability. Aim for a 30° angle from the anchor points to the connection points on your hammock, creating a gentle curve that distributes weight evenly and prevents tipping.Select appropriate hardware
Use hardware rated for at least twice your weight capacity. Carabiners, eye bolts, and straps should all exceed your maximum load requirements. Inspect all components regularly for wear or damage.Practice safe entry and exit techniques
Many hammock accidents occur during entry or exit. Always approach from the side, using both hands to stabilize yourself while slowly sitting down before swinging your legs up. Exit by bringing your feet to the ground first before standing.Assess environmental hazards
Before hanging, check for hazards like sharp branches, unstable trees, or ground obstructions. Indoor environments require checking for ceiling fan clearance and furniture positioning. Comprehensive indoor and outdoor hammock safety awareness prevents accidents.
Understanding these fundamental principles provides the foundation for any hammock installation, ensuring your relaxation remains safe and worry-free.
Perfect Tree-to-Tree Placement: The Classic Outdoor Setup
The quintessential hammock experience involves hanging between two trees – a classic setup that combines natural beauty with practical support. Creating this ideal outdoor hanging requires careful tree selection and proper installation techniques.
Selecting the Right Trees
Begin by identifying healthy trees with these characteristics:
* Diameter of at least 6-12 inches (15-30 cm) at hanging height
* No visible damage, disease, or signs of weakness
* Firmly rooted with no leaning or movement
* Adequate distance between trees (hammock length plus about 2 feet/0.6 meters)
Different tree species offer varying levels of support. Hardwoods like oak, maple, and hickory provide excellent stability, while you should avoid softer woods like pine or trees with brittle branches.
Protecting Tree Health
Responsible hammock hanging requires protecting your trees:
1. Use wide tree straps (at least 1-2 inches/2.5-5 cm) to distribute pressure
2. Never nail or screw directly into trees
3. Periodically rotate your hammock location to prevent bark compression
4. Remove setups during off-seasons to allow recovery
Step-by-Step Hanging Process
- Measure the distance between your trees to ensure it matches your hammock length plus approximately 2 feet (0.6 meters)
- Wrap tree straps around each tree at about 5-6 feet (1.5-1.8 meters) height
- Secure straps according to their design (buckle, cinch, or wrap systems)
- Attach your hammock to the straps using carabiners or included hardware
- Adjust height and tension to create a 30° angle from horizontal at the attachment points
Our collection of premium hammocks and stands includes options specifically designed for tree-to-tree hanging, with appropriate tree protection features built in.
Fine-Tuning Your Setup
After initial installation, test your hammock carefully by gradually applying weight. Make adjustments to achieve:
* The right amount of sag (neither too tight nor too loose)
* Appropriate height when fully weighted
* Equal tension on both sides
* Stable positioning that doesn’t shift during use
This classic outdoor setup delivers the authentic hammock experience, with natural shade and the gentle sounds of nature enhancing your relaxation.
Creating a Dedicated Hammock Oasis with Posts
When trees aren’t available or ideally positioned, installing dedicated hammock posts creates a permanent hammock oasis exactly where you want it. This approach offers complete control over placement while adding an architectural feature to your landscape.
Benefits of Dedicated Posts
- Precise positioning for optimal sun/shade balance
- Installation in any part of your garden regardless of trees
- Consistent, reliable support that doesn’t change with seasons
- Aesthetic enhancement through post design and landscaping
- No concerns about tree health or damage
Materials and Specifications
Choose materials based on your climate and aesthetic preferences:
* Pressure-treated wood: 4×4 or 6×6 inches (10×10 or 15×15 cm), rated for ground contact
* Metal posts: Galvanized steel or powder-coated for weather resistance
* Decorative options: Cedar, redwood, or composite materials for enhanced appearance
Installation Process
- Mark your post locations, ensuring proper distance for your hammock (typically 14-15 feet/4.3-4.6 meters apart)
- Dig holes 2-3 feet (0.6-0.9 meters) deep and 3 times the post width
- Add 6 inches (15 cm) of gravel at the base for drainage
- Set posts, ensuring they’re perfectly vertical using a level
- Pour concrete around posts, sloping slightly away from the post for water runoff
- Allow concrete to cure fully (typically 3-7 days) before hanging your hammock
- Attach appropriate hammock hardware at 5-6 feet (1.5-1.8 meters) height
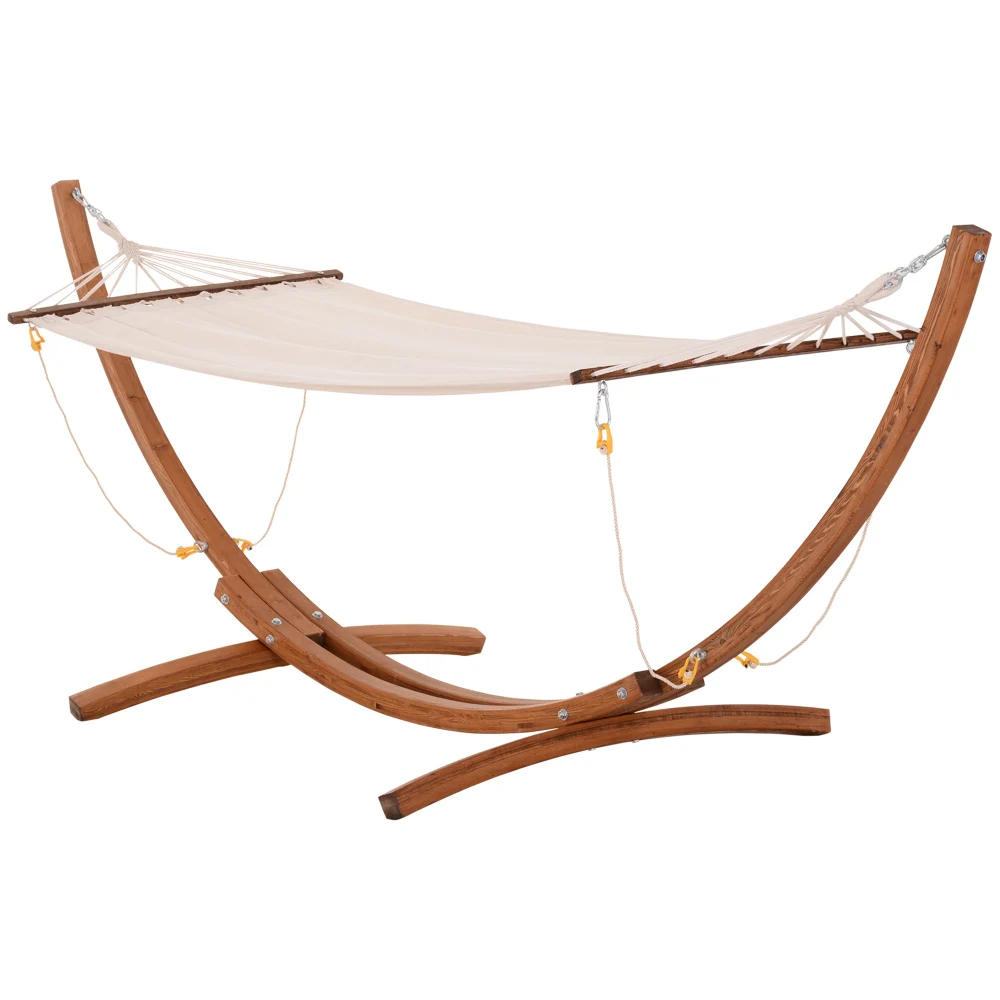
For those seeking an easier solution, our selection of wooden hammock stands offers the beauty and permanence of posts without the need for concrete installation.
Enhancing Your Hammock Oasis
Once your posts are installed, consider these enhancements:
* Plant climbing vines for natural shade and beauty
* Install solar lighting for evening enjoyment
* Create a mulched or paved area beneath for low maintenance
* Add complementary landscaping to create a dedicated relaxation zone
This permanent solution creates a hammock destination that becomes a focal point in your outdoor living space.
Maximizing Porch, Deck, and Pergola Potential
Existing structures like porches, decks, and pergolas offer ready-made frameworks for hammock hanging. These elevated locations often provide ideal sight lines, cooling breezes, and convenient access while requiring minimal additional materials.
Identifying Structural Support Points
When working with built structures, always locate the main support elements:
* On porches and decks: Find posts, beams, or joists (not just railings)
* On pergolas: Identify main support posts and overhead beams
* For all structures: Ensure components are structurally sound and firmly anchored
Never attach to decorative elements, railings designed only for leaning, or any component showing signs of weakness.
Hardware Selection for Wooden Structures
Choose hardware appropriate for permanent installation:
* Use lag bolts or eye bolts at least 3/8 inch (10 mm) in diameter
* Select stainless steel or hot-dipped galvanized hardware for weather resistance
* Ensure bolts penetrate at least 3 inches (7.5 cm) into structural wood
* Pre-drill appropriate pilot holes to prevent splitting
Installation Techniques
- Locate structural supports using a stud finder or visual inspection
- Mark mounting points that allow proper hammock distance
- Drill appropriate pilot holes (typically 1/8 inch/3 mm smaller than your bolt)
- Install eye bolts or hooks, ensuring they’re screwed in completely
- Test by pulling firmly before attaching your hammock
These structures often accommodate different indoor and outdoor hammock locations throughout the year, offering seasonal flexibility.
Design Integration
Harmonize your hammock with the existing structure:
* Choose fabric colors that complement your outdoor furniture
* Consider adding outdoor cushions or pillows in coordinating colors
* Position to take advantage of existing shade structures
* Ensure your hammock doesn’t obstruct pathways or seating areas
These built structures offer the perfect compromise between permanent installation and the authentic outdoor experience of tree hanging.
Indoor Hammock Installation: Bringing Outdoor Comfort Inside
Installing a hammock indoors extends your relaxation potential throughout all seasons and weather conditions. Indoor hammocks create unique lounging spaces in living rooms, bedrooms, sunrooms, or home offices while adding distinctive design elements to your interior.
Finding Secure Indoor Anchor Points
Safety begins with proper anchoring:
* Locate wall studs using a stud finder – typically spaced 16 or 24 inches (40 or 61 cm) apart
* For ceiling mounting, identify solid joists, not just drywall
* Never mount to drywall, paneling, or decorative elements without structural backing
* Consider the wall or ceiling construction – different materials require different approaches
Many homeowners wonder is it safe to hang a hammock indoors, and the answer is yes – when properly mounted to structural elements.
Hardware Selection for Interior Installation
Indoor mounting requires specific hardware:
* Eye bolts or hammock hooks rated for at least 300 lbs (136 kg)
* Stainless steel or decorative hardware options for visual appeal
* Wall-mount anchors designed specifically for hammocks
* Mounting plates for distributing weight across multiple studs (optional)
Step-by-Step Wall Mounting
- Determine optimal height (typically 4-5 feet/1.2-1.5 meters from the floor)
- Find and mark studs where your hammock will hang
- Drill pilot holes slightly smaller than your mounting hardware
- Install eye bolts or hammock hooks, ensuring they’re fully secured
- Test by applying gradual weight before full use
Room Selection and Placement
Different rooms offer varied hammock experiences:
* Living rooms: Social hammocking in central living spaces
* Bedrooms: Reading nooks or alternative sleeping options
* Sunrooms: Nature-connected indoor relaxation
* Home offices: Brainstorming and breakout spaces
Explore more options for the best places to hang a hammock indoors to find your perfect interior location.
Space Requirements and Clearance
Indoor hammocks require careful spatial planning:
* Minimum wall-to-wall distance: hammock length plus 2 feet (0.6 meters)
* Clearance from furniture: at least 2 feet (0.6 meters) on all sides
* Height clearance: minimum 7 feet (2.1 meters) for traditional hammocks
* Floor protection beneath for heavy use areas
With proper installation, indoor hammocks become architectural features that enhance both your decor and quality of life.
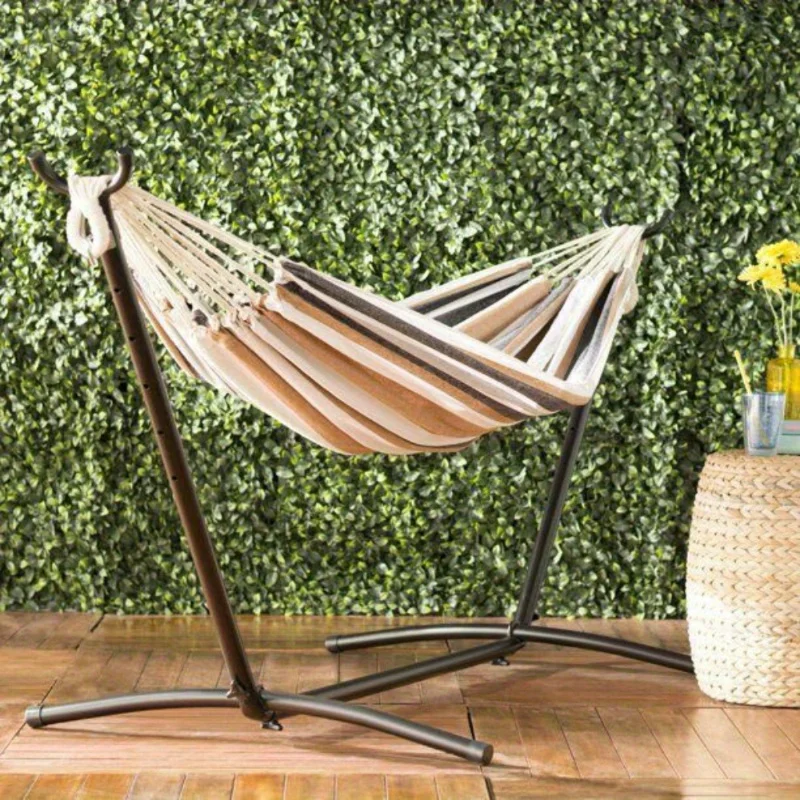
Selecting the Perfect Hammock Stand for Ultimate Flexibility
Hammock stands provide the ultimate placement flexibility, allowing you to position your hammock virtually anywhere with a flat surface. This solution eliminates the need for trees, posts, or wall mounting while offering portability and adaptability.
Advantages of Hammock Stands
- Place your hammock anywhere with adequate flat space
- Relocate easily as sun, shade, or scenery preferences change
- Avoid any permanent modifications to trees or structures
- Use indoors during winter or outdoors during pleasant weather
- Achieve perfect hammock tension and height through adjustable features
Types of Hammock Stands
Different stand styles suit various needs:
Metal Stands
* Typically lightweight aluminum or steel construction
* Excellent durability and weather resistance
* Modern aesthetic with clean lines
* Often feature adjustable dimensions
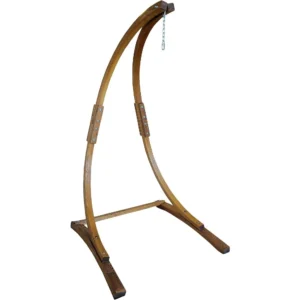
Wooden Stands
* Crafted from cedar, cypress, or other weather-resistant woods
* Warm, natural aesthetic that enhances outdoor spaces
* Heavier and more stable in windy conditions
* Often become landscape features in themselves
Portable Stands
* Lightweight, collapsible designs for travel or storage
* Quick assembly without tools
* Compact enough to transport in vehicles
* Ideal for camping, beach trips, or rental properties
Our collection of portable hammock stands includes options ranging from ultralight travel models to robust portable designs for regular use.
Space Requirements
Plan adequate room for your stand:
* Standard length: 14-15 feet (4.3-4.6 meters)
* Width clearance: 4-5 feet (1.2-1.5 meters)
* Total footprint: 16-20 square feet (1.5-1.9 square meters)
* Surface requirements: Flat, level ground (grass, decking, concrete, or indoor flooring)
Setup and Stability Considerations
For maximum stability and safety:
1. Assemble on completely level ground
2. Follow all manufacturer instructions precisely
3. Test joints and connections before full weight loading
4. Consider additional anchoring in windy conditions
5. Place on outdoor rugs or pads when on delicate surfaces
Hammock stands represent the most versatile solution for hammock placement, accommodating changing needs and locations throughout all seasons.
Creative Solutions for Challenging Spaces
Not everyone has the luxury of perfectly spaced trees or ample room for standard hammock setups. Fortunately, creative solutions exist for nearly any space constraint, allowing hammock enjoyment even in challenging environments.
Single-Tree Solutions
When only one tree is available:
* Combine a tree strap on one end with a portable post on the other
* Use a wall-mounted anchor point as the second connection
* Consider a hammock chair that requires only one suspension point
* Install a free-standing C-frame that uses the tree as a single anchor
Small Space Innovations
Limited outdoor areas can still accommodate hammocks:
* Hammock chairs require just 4-6 square feet (0.4-0.6 square meters) of space
* Brazilian-style hammocks can hang with more significant sag, reducing length requirements
* Wall-to-post configurations maximize corner spaces
* Vertical space utilization through elevated mounting
Our hammock chairs with stands provide complete relaxation experiences while requiring minimal floor space, making them perfect for apartments, small balconies, or compact gardens.
Urban Environment Adaptations
City dwellers can enjoy hammocks with these approaches:
* Balcony installations using non-damaging tension systems
* Doorway hammock chairs for apartment living
* Roof garden setups with portable stands
* Room divider hammocks that serve dual purposes
Temporary Options for Renters
Non-permanent solutions preserve deposit returns:
* Over-the-door hammock chair hangers
* Tension-mounted systems between sturdy doorframes
* Stand-based installations requiring no structural modification
* Portable tripod stands for hammock chairs
With creative thinking, even the most challenging spaces can accommodate some form of hammock relaxation – it’s simply a matter of matching the right hammock style to your available space.

Dark Wood Hammock Sets, Porch Swing Chair Sets
$653.82 Select options This product has multiple variants. The options may be chosen on the product page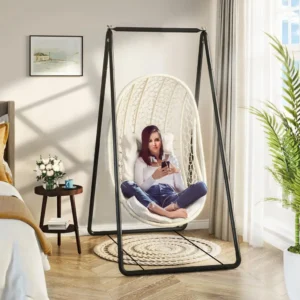
A-Frame Stand Hammock Sets, Swinging Hammock Chair Sets
$154.62 Select options This product has multiple variants. The options may be chosen on the product page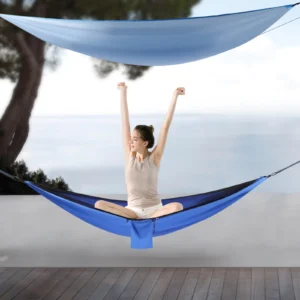
Camping Hammock Sets with Bug Net, Ultralight Camping Hammock Sets
$139.72 Select options This product has multiple variants. The options may be chosen on the product page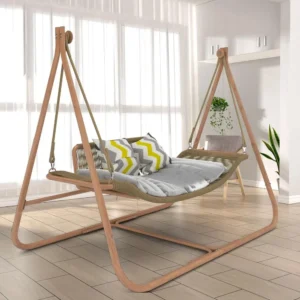
Light Wood Hammock Sets, Swinging Hammock Chair Sets
$1,359.35 Select options This product has multiple variants. The options may be chosen on the product page
Quilted Fabric Hammock Sets, Spreader Bar Hammock Sets
$195.67 Select options This product has multiple variants. The options may be chosen on the product page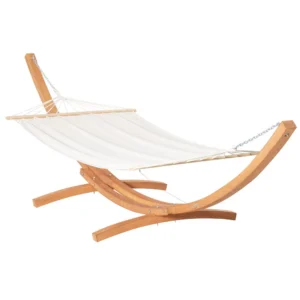
Classic Wooden Stand Hammock Sets, Heavy Duty Hammock Sets
$1,061.68 Select options This product has multiple variants. The options may be chosen on the product page
Optimizing Your Hammock Experience with Strategic Placement
Beyond the technical aspects of secure hanging, strategic hammock placement enhances your relaxation experience through environmental considerations. Thoughtful positioning transforms a simple hammock into a destination retreat.
Sun and Shade Planning
Optimize your comfort through careful sun exposure planning:
* Morning sun positions for gentle wake-up experiences
* Dappled shade for afternoon reading and relaxation
* Evening sun spots for sunset viewing
* Seasonal adjustments as the sun’s path changes
Consider tracking sun patterns throughout the day before finalizing permanent installations. Trees that provide perfect shade in morning might deliver full sun exposure by afternoon.
Scenic View Optimization
Position your hammock to capture the best available views:
* Face water features for relaxing ripple effects
* Align with garden focal points or flowering plants
* Capture distant vistas when available
* Consider both seated and reclined viewing angles
Remember that your perspective from inside the hammock will be different from what you see when standing – test various angles before permanent mounting.
Privacy Considerations
Create a secluded retreat through thoughtful placement:
* Use existing structures like garden walls or outbuildings as visual barriers
* Plant strategic screening with tall grasses or shrubs
* Position to minimize visibility from neighboring properties
* Consider sight lines from within your own home
Creating a Complete Relaxation Zone
Enhance your hammock area with complementary elements:
* Small side table within reach for drinks or books
* Weather-resistant storage for pillows and accessories
* Ambient lighting for evening enjoyment
* Container plants for added privacy and beauty
The elements of a perfect hammock haven extend beyond the hammock itself to create a complete sensory experience that invites regular use.
Hammock Accessories That Enhance Placement Options
The right accessories not only improve comfort but can significantly expand your hammock placement possibilities. These add-ons solve common challenges while enhancing functionality in various environments.
Essential Hanging Hardware
Quality hanging accessories improve safety and versatility:
* Tree straps (minimum 1-2 inches/2.5-5 cm wide) protect trees and provide multiple attachment points
* Heavy-duty carabiners rated for 1,000+ lbs (454+ kg) offer quick connection and disconnection
* Extension ropes or chains accommodate greater distances between anchor points
* S-hooks and quick links provide additional connection options
Weather Protection Accessories
Extend your hammock season with protective gear:
* Rain flies (typically 10×12 feet/3×3.7 meters) create dry zones during light precipitation
* Bug nets enclose your hammock in insect-free environments
* Wind shields block cooling breezes on chilly days
* UV-protective covers extend fabric life during extended outdoor placement
Our camping hammock sets with bug nets combine comfort with protection from insects and light rain, making them ideal for extended outdoor placement.
Comfort Enhancers
Improve your relaxation experience:
* Hammock pillows designed to stay in place during use
* Underquilts that add insulation for cooler weather
* Hammock pads that prevent diagonal slipping
* Drink holders and storage pouches that attach to hammock edges
Support Systems
Expand placement possibilities:
* Hammock wall mounts for indoor or outdoor installation
* Ceiling hook systems for overhead mounting
* Tensioning systems that adjust sag precisely
* Hammock wheel kits for easy repositioning of stands
The right accessories transform basic hammocks into adaptable relaxation systems suitable for nearly any environment, while extending usable seasons and enhancing overall comfort.
Is My Hammock Really Secure? Testing Your Installation
After completing your hammock installation, a systematic safety check ensures your setup will provide reliable support. This verification process should become routine before each use season or after any adjustment to your hanging system.
Pre-Use Safety Check Protocol
Follow this sequence before first use:
1. Visually inspect all components for damage or wear
2. Verify all connections are properly secured and tightened
3. Check anchor points for signs of weakness or movement
4. Ensure proper height and distance between hanging points
5. Confirm appropriate sag angle (approximately 30° from horizontal)
Weight Testing Procedure
Gradually test weight capacity:
1. Apply gentle pressure with your hands
2. Sit in the center while keeping feet on the ground
3. Slowly transfer full weight while maintaining ground contact
4. Finally, lift feet and distribute weight fully in the hammock
5. Listen for unusual sounds and watch for unexpected movement
Understanding proper hammock weight limits helps prevent overloading your system, especially with multiple users.
Warning Signs to Watch For
Be alert for these indicators of potential problems:
* Creaking or popping sounds from anchor points
* Visible movement or shifting of hardware
* Stretching or fraying of straps or ropes
* Excessive sag developing after initial setup
* Any sudden shifts or drops when weight is applied
Maintenance Check Schedule
Establish regular inspection routines:
* Before first use of the season
* After exposure to severe weather
* Monthly during heavy-use periods
* Any time you notice a change in hammock performance
Address any concerns immediately – never use a hammock with questionable stability or damaged components.
Can I Hang My Hammock Indoors Without Drilling Holes?
Many people, especially renters, want to enjoy indoor hammocks without permanent modifications to walls or ceilings. While non-drilling options have limitations, several solutions can work in the right circumstances.
Stand-Based Indoor Solutions
The most reliable non-drilling approach uses free-standing supports:
* Traditional hammock stands work in rooms with adequate floor space
* C-frame stands require less space but support only one side
* Hammock chair stands need minimal footprint (approximately 4×4 feet/1.2×1.2 meters)
* Tensegrity stands offer modern aesthetics with excellent stability
These solutions provide full support without any wall contact, making them ideal for rental properties.
Doorway Options
Doorframes can sometimes support hammock chairs:
* Over-the-door hangers rated for hammock use (weight capacity typically limited to 200 lbs/90 kg)
* Removable doorway bars with hammock attachment points
* Tension systems that brace against doorframes
Important: Standard doorways and their hardware aren’t designed for full hammock hanging – these solutions work best for lightweight hammock chairs only.
Tension-Based Systems
For temporary installations, consider:
* Room-to-room tension kits that press against opposite walls
* Furniture-based anchoring (using very heavy, stable furniture)
* Removable pressure mounts similar to those used for baby gates
Remember that these non-permanent solutions typically offer lower weight capacities and may require frequent adjustment to maintain tension.
Safety Considerations
When using non-drilling options:
* Always respect stated weight limits, which are typically lower than permanent installations
* Test gradually and remain close to the floor during initial use
* Consider placing cushions beneath new setups
* Understand that damage can still occur to paint, trim, or door hardware
What Type of Hammock Works Best for Different Placement Scenarios?
Different hammock styles have distinct hanging requirements and characteristics that make them better suited for specific environments. Matching your hammock type to your available space ensures the best experience.
Hammock Types and Their Ideal Placements
Brazilian/Traditional Hammocks
* Best for: Spaces with adjustable distance between anchor points
* Hanging style: Significant sag in the middle, ends pulled toward center
* Space needed: Can adapt to shorter distances with more sag
* Material considerations: Cotton for indoor, weather-resistant synthetics for outdoor
* Placement notes: Excellent for diagonal lying position and adaptable hanging
Spreader Bar Hammocks
* Best for: Fixed distances that match their length exactly
* Hanging style: Minimal sag, relatively flat lying surface
* Space needed: Requires full length installation with minimal adjustment tolerance
* Material considerations: Quilted fabrics for indoor, marine-grade materials for outdoor
* Placement notes: Needs more precise installation but offers easier entry/exit
Camping/Parachute Hammocks
* Best for: Variable environments and frequent repositioning
* Hanging style: Moderate sag, wraps slightly around body
* Space needed: Highly adaptable to different hanging distances
* Material considerations: Lightweight, quick-drying synthetics
* Placement notes: Excellent for temporary setups and travel
Hammock Chairs
* Best for: Very limited spaces or single-point suspension
* Hanging style: Vertical hanging from one strong anchor point
* Space needed: Minimal footprint (about 3×3 feet/0.9×0.9 meters)
* Material considerations: Matches intended environment (indoor/outdoor)
* Placement notes: Perfect for balconies, reading nooks, or small gardens
Matching your hammock style to your available space ensures better comfort and appropriate use of your environment.
How Do I Protect My Trees and Property When Hanging a Hammock?
Responsible hammock hanging preserves both natural and built environments. With the right techniques, you can enjoy your hammock without causing damage to trees, walls, or other structures.
Tree-Safe Hanging Practices
Protect trees with these approaches:
* Always use wide tree straps (minimum 1-2 inches/2.5-5 cm) to distribute pressure
* Never nail, screw, or permanently affix hardware directly to trees
* Rotate your hammock location periodically to prevent sustained pressure
* Inspect trees regularly for signs of damage or stress
* Avoid hanging from young trees or species with soft bark
Wall and Ceiling Protection
For indoor installations:
* Always mount to structural elements (studs or joists), never drywall alone
* Use appropriate hardware sized for your weight and wall construction
* Install mounting plates to distribute force across larger areas
* Apply silicone sealant around outdoor mounting points to prevent water damage
* Consider removable options if you’re concerned about permanent modifications
Preventing Long-Term Damage
Minimize impact with these practices:
* Remove outdoor hammocks during harsh weather seasons
* Clean and dry hammocks before long-term storage
* Regularly inspect all mounting hardware for rust or weakness
* Alternate between multiple hanging locations
Understanding whether you can leave a hammock outside helps protect both your investment and the structures supporting it.
Eco-Friendly Approaches
Consider these environmentally conscious hanging methods:
* Use hammock stands instead of trees in sensitive ecosystems
* Choose hardware and accessories made from sustainable materials
* Follow local guidelines when hanging hammocks in public parks or natural areas
* Leave no trace by removing all temporary setups completely
With thoughtful installation and regular monitoring, your hammock can provide years of enjoyment without negative environmental impact.
Questions to Ask Before Choosing Your Hammock Placement
Finding your perfect hammock location starts with understanding your specific needs and environment. Ask yourself these key questions to guide your placement decisions.
What Is My Primary Relaxation Goal?
- Am I seeking a reading nook, napping spot, or meditation space?
- Do I want an observation point for nature or sunset viewing?
- Will this be for solo relaxation or social gathering?
- Am I looking for year-round use or seasonal enjoyment?
Your intended use significantly impacts optimal placement. Reading hammocks benefit from good natural light, while napping spots might prioritize shade and quiet.
What Space Constraints Am I Working With?
- What distance is available between potential anchor points?
- Is the area wide enough for hammock sway and entry/exit?
- Are there height limitations indoors or overhead obstacles outdoors?
- What surface lies beneath my potential hammock location?
Be realistic about your available space – measure carefully rather than estimating distances, particularly for indoor installations.
How Will Seasons Affect My Hammock Experience?
- How does sunlight movement change throughout the year?
- Will falling leaves, fruit, or sap create cleanliness issues?
- Are there seasonal wind patterns to consider?
- How will rain, snow, or humidity impact my chosen location?
Consider creating seasonal hammock locations rather than expecting one spot to be perfect year-round.
What Aesthetic and Experience Factors Matter Most?
- What views or visual elements do I want to incorporate?
- How important is privacy from neighbors or family members?
- Do I want sun, shade, or a mix at specific times of day?
- What sounds or smells would enhance my hammock experience?
The sensory environment significantly impacts relaxation quality – consider all senses when evaluating potential locations.
Am I Planning for Multiple Hammock Scenarios?
- Will I need both indoor and outdoor options?
- Should I consider portable solutions for travel?
- Do I want to accommodate multiple users simultaneously?
- Would different hammock types serve different purposes?
Many hammock enthusiasts find that a combination of locations and setups provides the most satisfying year-round experience.
By thoughtfully answering these questions, you’ll identify the perfect hammock placement that balances practical considerations with your personal relaxation preferences.